How To Start a WordPress Website or Blog Using Bluehost
Get your freelance website or blog up and running right now by following these 3 steps!
Install WordPress
Pick a Theme, free or paid
Step 1: Get a Domain Name and Web Hosting
To get your website started, the first step is to pick a domain name. For bloggers and freelance writers, I suggest choosing your own name, a name that reflects your writing brand, or the name of your registered company.
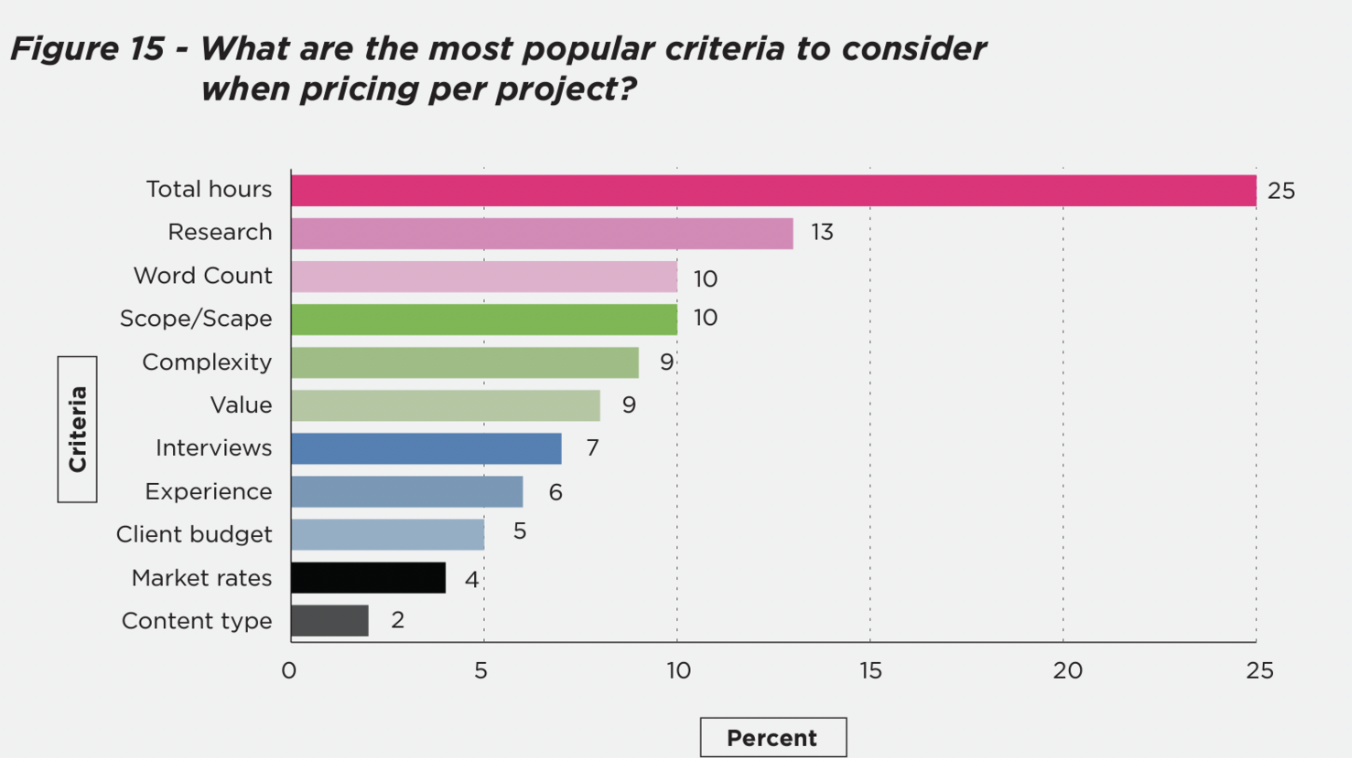
As soon as you have brainstormed a few different possible domain names for your website, you need to check to make sure the domain name you want is available at a decent price.
As a quick example, I recently started an online book club for women and wanted to call it girlfriendsbookclub.com. Unfortunately, someone had already snagged the domain name and it was only available to purchase for $1,000. I was not willing to pay $1,000 for a domain name, because that is absurd, so I had to be creative and search for other options. Another similar name was available, and it only cost $11.99, which is a reasonable yearly price for a domain name.
If a price is too high for a certain domain name, or if the domain name is not available, explore other options.
For example, when I started my freelance writing business, I wanted the domain ashleycummings.com. Another Ashley Cummings already had that domain name reserved, so I brand myself with my full name and middle initial, ashleyrcummings.com. Over time, it has been a great differentiator and a great fit for me. As you pick a domain name, you’ll be able to settle on the right fit at the right price.
To check a domain name, you can use the services of one of the most popular web hosting companies—Bluehost. Bluehost is competitively priced and compatible with the most popular website platform, WordPress.
To check if your domain name is available, head straight to Bluehost, and enter your desired domain into the “new domain” box.

Once you press “next,” Bluehost will let you know if the domain is available or not. As soon as you find an available domain name, you can select hosting for your domain.
If you already have a domain purchased, through GoDaddy or another service, for example, you can simply move directly to step 2 and pick a hosting package—Basic, Plus, or Choice Plus.

Once you select your domain name and package, Bluehost will ask you for some basic account information, your package request options, and ask for a payment method.
As soon as you have completed these easy steps, you will have a domain name, hosting, and you will be officially ready to install WordPress.
As a quick after note, there are many add on features in Bluehost, but the only one I would suggest is to make sure you select automatic renewal, so you don’t risk losing your domain name in the future.
Action Item #1: Okay, this is the part of the book where I tell you to head over to Bluehost, purchase a hosting package, and select a domain name. There is no better time to get started than now. Go for it!
Step 2: Installing WordPress On Your Computer
Now that you have purchased web hosting through Bluehost, it’s time to download WordPress.
Here’s how to install WordPress from your BlueHost Account (2020 version).
1. Login to your Bluehost account.
2. Click on “My Sites” on the top left navigation bar.
3. Click “Create New Site.”
4. Select “Use WordPress.”
5. Name your site.
6. Select the domain you just registered from the drop-down menu. (Note: If you already have a Bluehost account, you will need to assign your domain first).
7. Bluehost will start installing WordPress.
8. You will see a screen that says “Congratulations, WordPress installed successfully.”
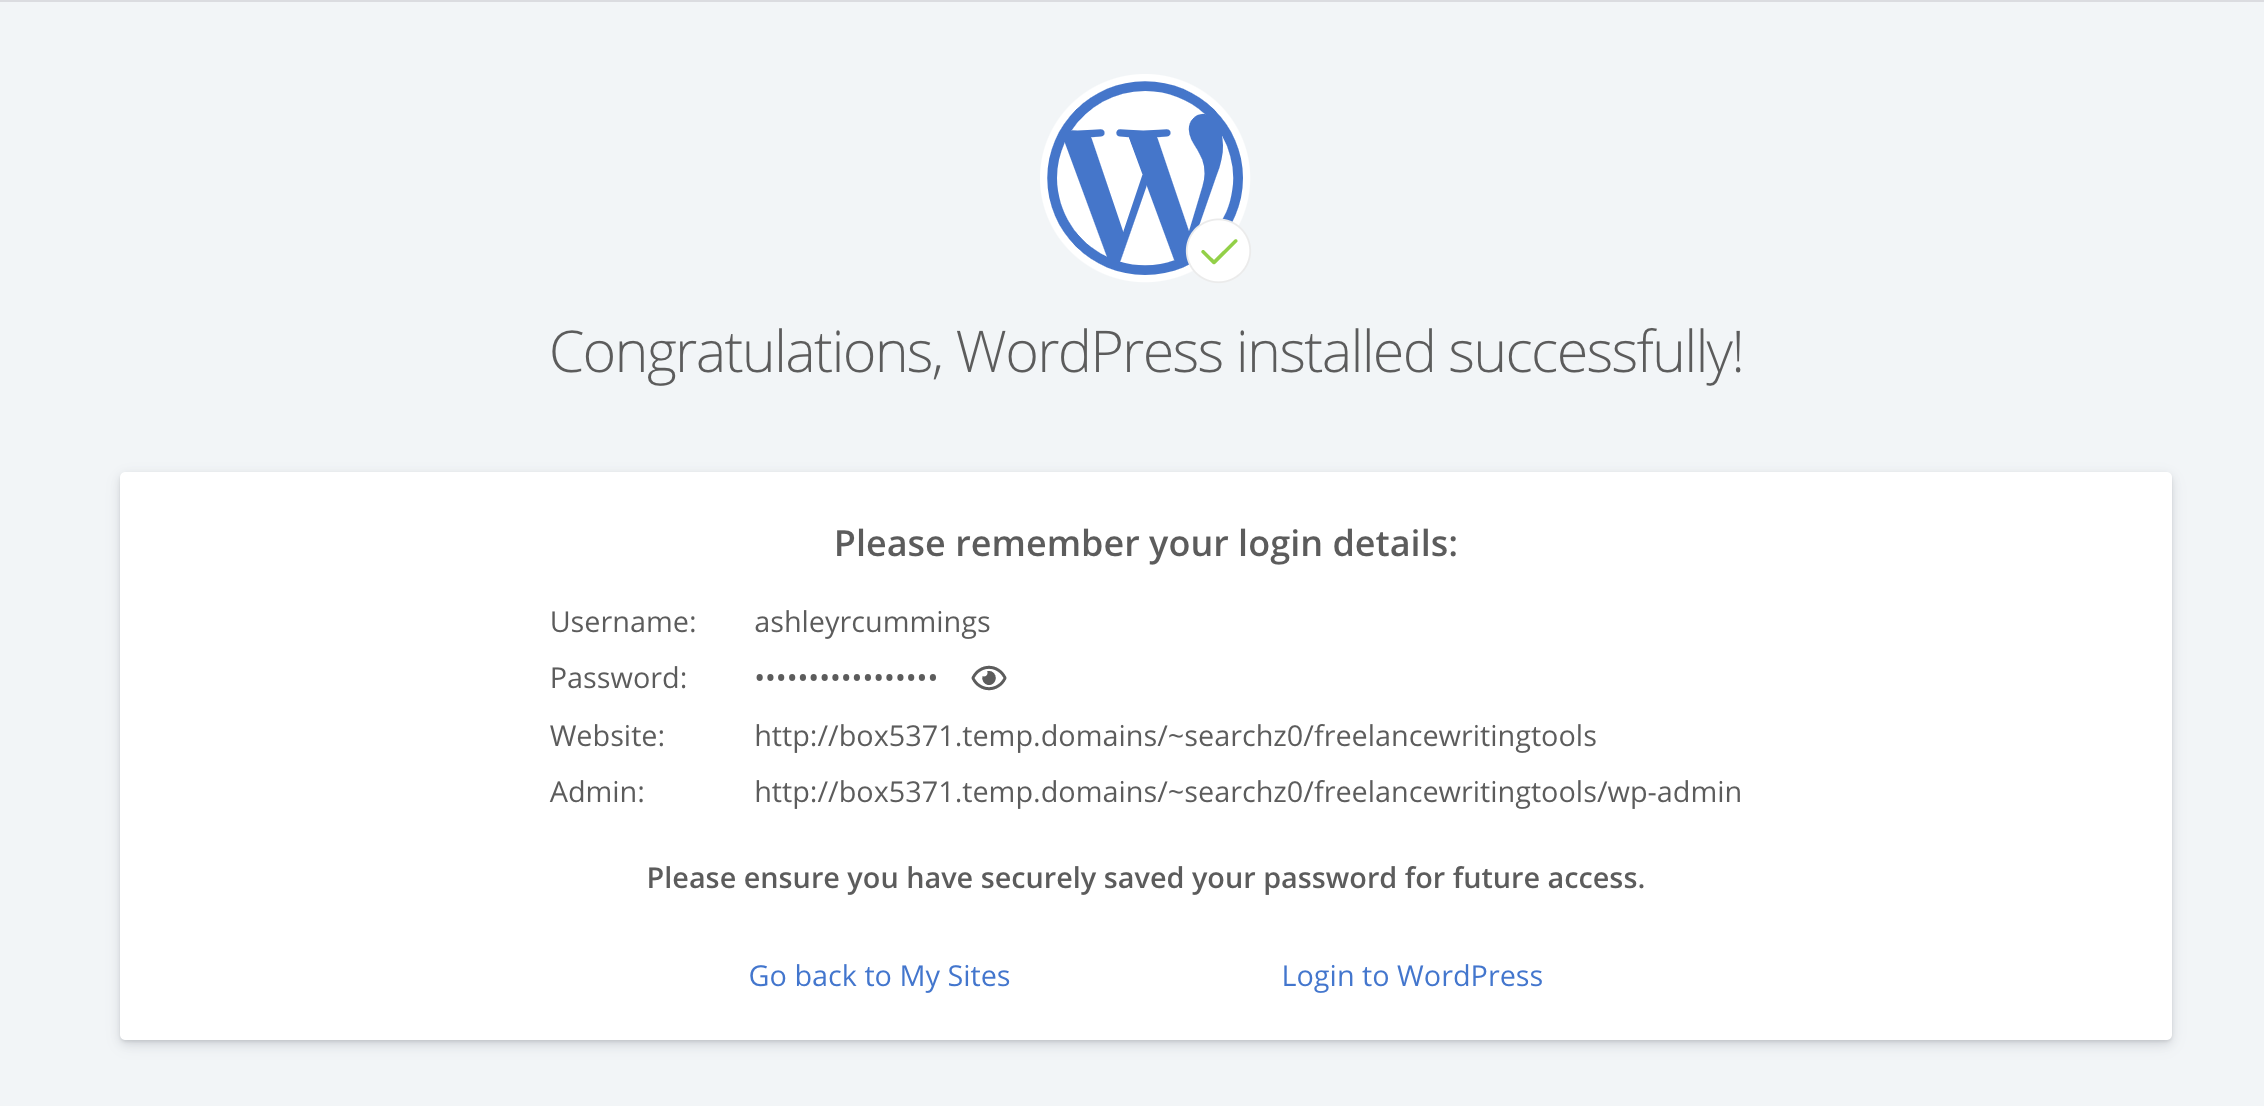
9. Write down your username and password, and then click on “Login to WordPress.”
10. Bluehost will log you into your new WordPress site. Once it’s set up, you will see the WordPress platform that is ready for you to customize.
That’s it! You officially know how to start a WordPress website or blog using Bluehost.
Action Item #2: Take the time to Login to your Bluehost account and install WordPress now. Hurry, I’m timing you! I bet you can do it in 5 minutes.
Step 3: Pick a Framework & A Theme
Congratulations! You now officially have a website for your freelance writing company. It feels good, right? You should certainly take the time to celebrate, because this is a huge step in making your way as a freelance writer <insert short dance party here>.
As you take a look at your new website, you probably notice that it’s not very attractive right now. While you have a domain, hosting, and WordPress installed, you’ll need to do a little work to customize your website, and make it pretty. Thankfully, there are places where you can download a framework and a theme to make it pretty.
This last step of picking framework and a theme is the part of the process that will take more time, because it involves you making decisions on how you want things to look.
To pick a theme, you can either pick a free WordPress theme, or you can get all fancy pants, and pay for a framework and theme. I recommend going the fancy pants route.
As many bloggers and freelance writers do, I use the StudioPress Genesis Framework, and I recommend you using it too. The reason I recommend the Genesis Framework is because it’s simple, intuitive, and many themes are built around this particular framework.
Once you have selected a framework, you can purchase one of the many lovely StudioPress Themes to beautify your website. To upload your theme, download the .zip file to your desktop, go to the “Appearance” section of your WordPress Dashboard, select “Themes,” click “Add New,” select the theme file you downloaded to your desktop, and press “Upload.” Then, all you need to do is select “Activate,” and your website will no longer look generic; it will look like you hired a professional designer to create your website.
Important Tip: As a quick side note, it’s difficult to understand the jargon when you are new to creating and downloading a website, framework, and theme. The analogy StudioPress uses is helpful in understanding the jargon. They say if a website were a car, WordPress would be the engine, Genesis would be the body and the frame, and a StudioPress theme would be the paint job.
There are many different parts of the WordPress engine that make your website work including plugins, widgets, and more. Thankfully, WordPress is fairly intuitive, and you’ll be able to customize your website as you go.
The Genesis Framework is the perfect frame or body for your website. It will keep your website organized and it’s a great basis for web designers to easily design themes and features that make your website look pretty.
Finally, when you pick one of the StudioPress Themes, you can customize the way your website looks, so it reflects your personality, niche, and style perfectly.
Action Item #3: Download the Genesis Framework and pick one of the StudioPress Themes that suits your fancy. Once you have completed this, you can spend time customizing the features of your personal website. Of course every website will be different, just make sure you include weekly website entries, an about page, samples of your work, your resume, and contact information.
Disclaimer: There are affiliate links in this post. If you sign up through one of my links, I will get a commission.